Categories
Uncategorized

Scavenger hunting from home

When my turn came around to host the extended-family group video call I was a bit intimidated… How would I possibly keep this hilarious crowd of hyperactive heckle-monsters entertained for a couple of hours?!

We’d just done a murder mystery game, and the back catalogue also includes several quizzes, charades and a variety of other party games. A friend had mentioned having a great time doing a remote scavenger hunt with colleagues, so I decided to develop a multi-round game that would meet these criteria:

  • Silly and fun
  • Indoors and self-contained
  • Suitable for a fairly large, mixed group
  • Not exclusionary through knowledge, skill or common sense
  • Do-able for people who’d just moved in and might not have unpacked yet
  • Work with individuals or pairs playing.
  • Get ’em up and moving
  • Get ’em problem solving
  • Gently competitive
  • Give them a chance to show off!

With some fantastic scheming assistants, I developed a four-round game.

  1. Hunt – get people moving, giving them a short time to collect specific items
  2. Pick – giving them broader criteria to match, and adding a chance to win loads of extra points!
  3. Panic! – give them a problem to solve, and let them really go to town with their explanation
  4. Present – a more chill round to wrap up, asking them to share an object and what it means to them.

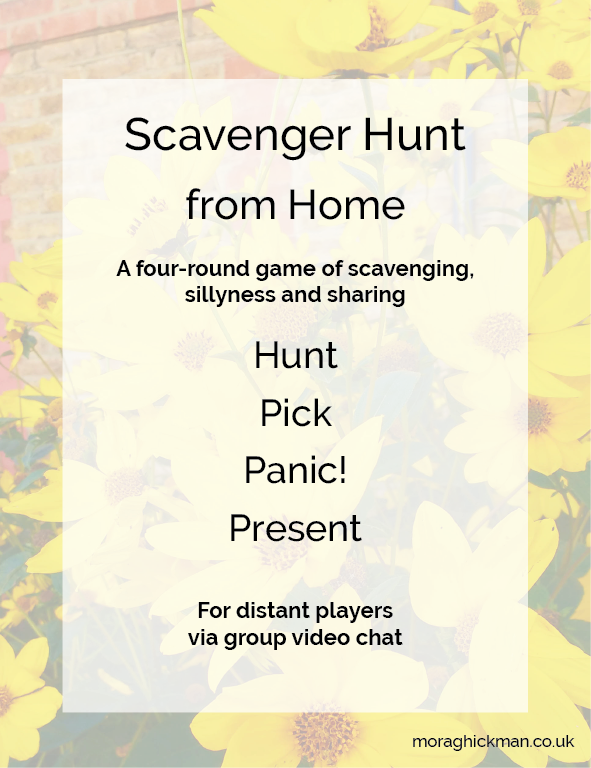
I can’t believe how well it went, so I’m sharing my materials and tips in the hopes others will have fun hosting and playing these games. If you read this page through, print out the scorecard and save the four ’round’ images ready to share, you should hopefully have everything you need to run the game yourself.

I found it really rewarding, especially seeing everyone dashing past their webcams on the way to grab objects, hearing folks dissolve into laughter, and listening to interesting and heart-warming presentations.

0: Preparation

There’s very little audience preparation required for this game, but it might be nice to let participants know about round 4 in advance, so that they can sort out an object and story they would like to share at the end. Just drop the round 4 image in to the group chat, email or invite when you arrange your meeting.

I’ve included an A4 score card you can print in advance to help keep track of what’s going on – it’s also included in a zip file with the other materials at the end of this post.

You may wish to prepare your own objects for each round, depending if you want to play as more of a participant or a leader.

When you set up the call, make sure you can see every video feed, as you’ll need to be able to watch everyone participating, not just who’s currently speaking.

Screen sharing can also be handy if you want to display the image for each round, or you can drop it in a group chat. Just try not to reveal the rounds in advance.

1: Hunt

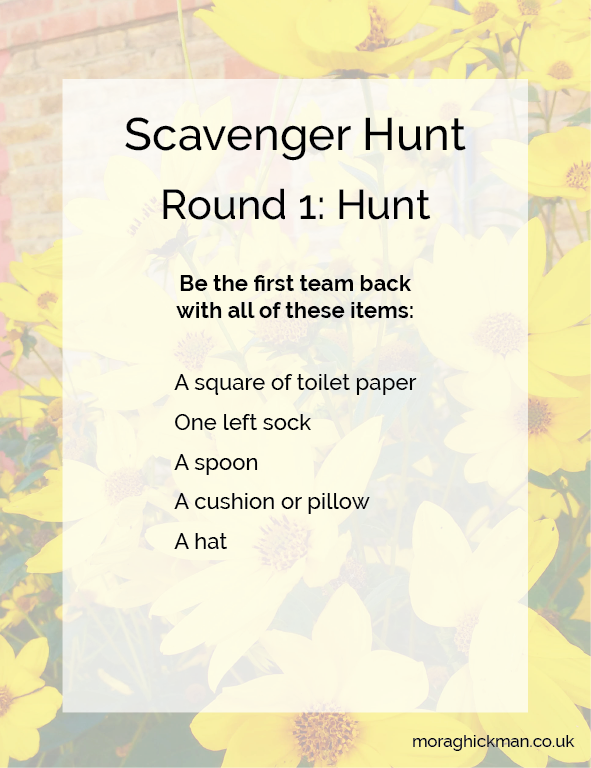
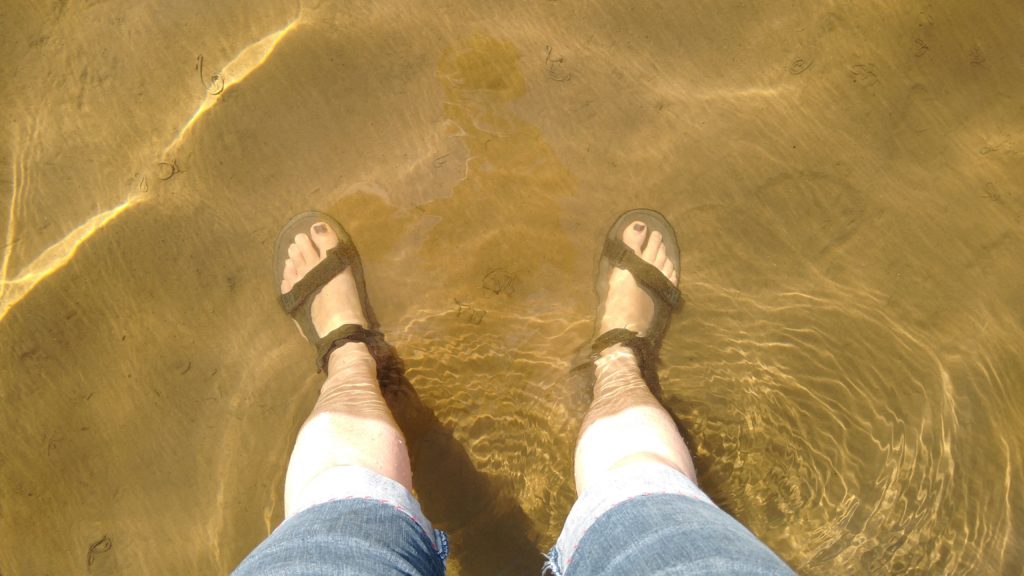
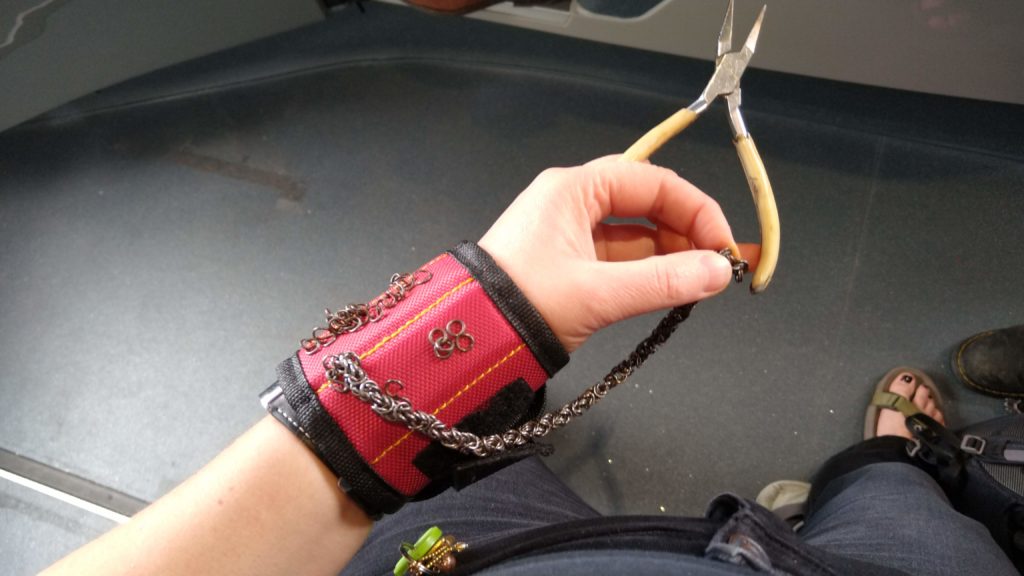
This round is pretty straightforward, and what people might expect from a scavenger hunt. The items are specific, but hopefully common enough for everyone to have them somewhere within fetching range. For one of my participants, they were all within arm’s reach of their seat, except the hat!

Scoring round 1

Keep an eye on everyone’s video feeds, and make a note of the first, second and third people back, just in case the first people haven’t actually got all the items.

Call out each item in the list and get everyone to hold theirs up at the same time – this can also encourage inter-participant heckling!

The winner is the first person/team who returned with all the items.

Round 2: Pick

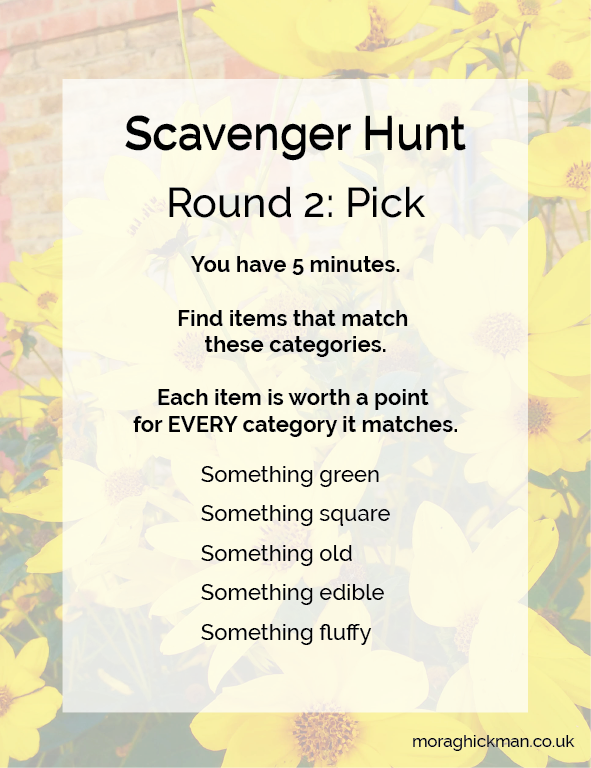
This round is a category-matching game that rewards thinking more than speed. You’ll definitely want to take your time explaining this round and making sure everyone gets it – trust me, you’ll save time later!

The key points to get across are:

  • You have five minutes
  • Gather five items
  • Each item gets a point for every category it matches. Here are a couple of examples:
    • A green apple? 2 points!
    • A square, green, fluffy cushion you’ve had for 10 years? 4 points!

Note: Holding up concrete example objects might help you explain here – if you can find them, show a green apple or your green fluffy square cushion! You may also like to explain how strict or lenient you’re going to be with the categories. Things like “does rectangular count as square”, “how old is old”. If it helps, for the second one I said something like “relative to the average age of an object of this type you’d be likely to encounter” – so 3 months might be old for an apple, but young for a chair.

Call out time warnings and count down at the end to add to the tension, if anyone’s not back by about 4 minutes.

Scoring round 2

The easiest way I found to score this round was to pick a category, eg. ‘something green’, then ask each participant in turn “Out of your 5 objects, how many are green?”. Write the number in the relevant box on the score card, then ask the next participant the same question. Only then repeat for the process for the other categories. This way no-one goes too long without contributing, hopefully helping them stay engaged.

Note: Watch out for people modifying their items after the time limit, though this can be pretty hilarious. No, adding a feather boa does not mean your apple is now fluffy.

Add the scores up. The winner is the person or team with the most points.

Round 3: Panic!

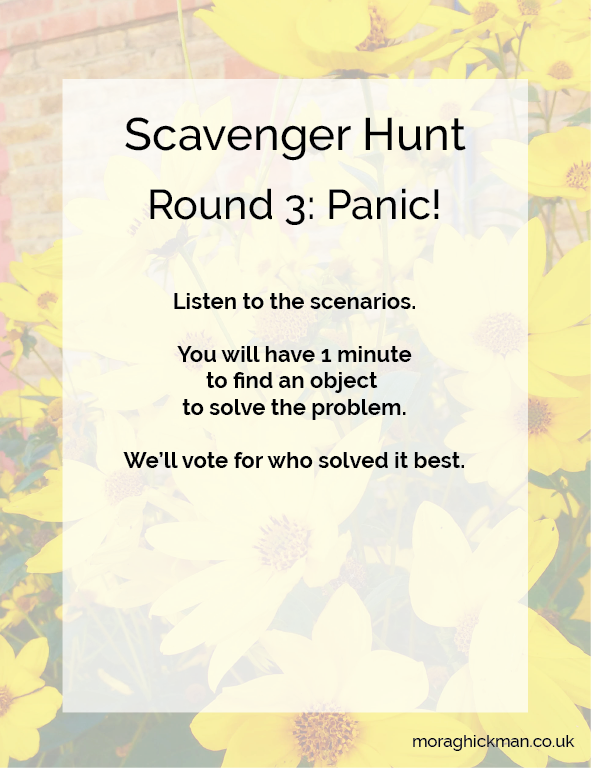
This round is probably my favourite.

The premise is pretty straightforward: “I’ll give you a problem, you have one minute to grab something (or things) to solve it, then tell us why your plan would work. We’ll vote on the best solution.”

Hamming it up with the questions will encourage the participants to do the same with their answer. People might win votes through having surprising or interesting objects on hand, by repurposing objects inventively, or using their quick wit to come up with a compelling or silly story.

I’ve come up with three problems, but I’d love to hear what you come up with if you invent any more.

NB: These problems are listed on the score card, so you don’t need to keep this page open.

  • Tea: You’re out of teabags! You MUST go to the shops if you’re going to get a cuppa, but your talkative neighbour might spot you – grab a disguise so you can get home quick!
  • Fish: Don’t ask me why your fish tank shattered, there’s no time! Grab a vessel to rescue your prized fish, then tell us why it’s the best thing for the job.
  • Zombies: Oh no, you left the door open! A zombie got in! Grab something to defend your domain from the slavering undead.

Ask a question, then complete the fetching, presentations and scoring BEFORE you move on to the next question.

Scoring round 3

I liked scoring this round by vote, as it’s subjective. You should be prepared to cast a tie-breaker vote if needed.

Ask each person in turn to display their object(s) and explain their solution. Encourage them to describe their fish, for example, and why it’ll do well in the vessel.

Note: Our winner had a really horrible fish, who was ‘rescued’ in a colander!

When everyone has presented their solution, ask each person in turn who gets their vote and tally it in the recipient’s box.

Tot up the votes, and cast your own tie-breaker vote if needed. You should have one winner for each of the three problems.

Round 4: Present

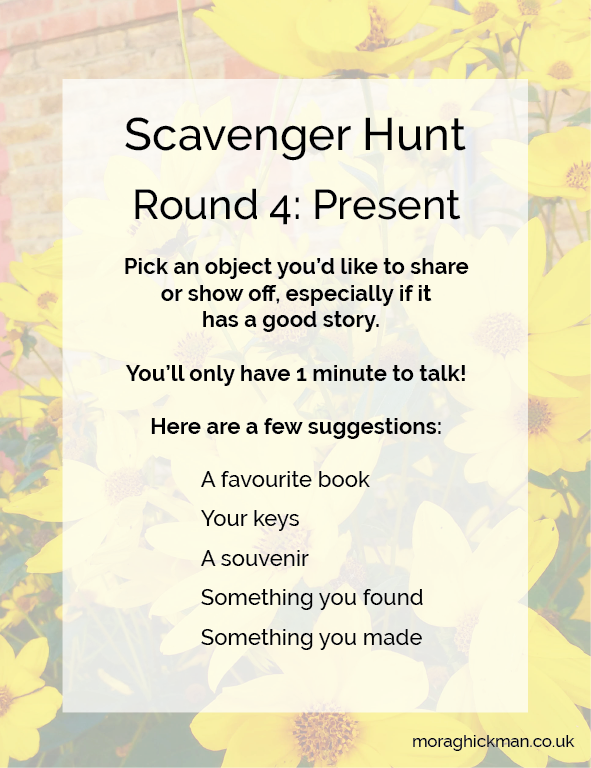
This round is non-competitive.

If you’ve got someone charismatic who loves to talk it might be easiest to invite them go first to break the ice. If you’re charismatic and love to talk, feel free to go first yourself! Tick people off as they present so you don’t miss anyone.

Give people 1 minute to talk, with a timer and hand signals to show when their time is coming to an end – this helps it be fair for the quieter folks. I found the other participants were really keen to give encouragement, show interest and ask questions after each presentation – it was really, really lovely.

Wrap up

You can wrap up by sharing the scores, especially if your participants are competitive! There should be one winner from round 1, one from round 2, and three from the problems in round 3.

I hope if you choose to run this game you let me know how it goes, or how I could improve it.

Thanks for reading!

Downloads

(A zip file with the four ’round’ images as .png files, and a .pdf of the score card for printing)

Categories
Blog

Finger protection

I often handle tiny bits of metal in ways that will get them very warm indeed – especially when I’m drilling, grinding or polishing. I’ve tried using pliers, clothespins, tweezers and other tools to hold parts, but nothing compares to the speed, strength and dexterity of my fingers. I’ve only got one set though, so here are my favourite solutions for making sure they last.

Neoprene skins

When I’m polishing, I use a set of four neoprene wee finger-gloves, which are secure, comfortable and let me grip most castings pretty firmly. They’ve saved me from bumps with the grinding disc or buffer multiple times, protect me from the majority of the heat, and give me time to let go if something does get hot enough to overwhelm them.

Some well-used Rhino finger protection skins from Cookson Gold. They come as two fingers and two thumbs

The stretchy fit makes them very secure and comfortable, a considerable improvement over my home-made leather finger-bags. The stitching is strong, and I find the neoprene stiffens less with gunk than leather, and while it’s not as tough it’s thicker, and sacrificially tears rather than grabbing during accidental contact. When these are sorry enough to replace I’ll try making my own, but I will definitely do heat tests first to make sure my material handles heat well and won’t, say, melt and weld to my skin…

Alligator tape

Another finger protection tool I really love, though rarely remember to use, is alligator tape. It’s a green-coated, non-stretch woven tape which sticks very emphatically to itself. I love it for protecting my fingers from abrasion, particularly when I’m using my Wolf wax carving tools with their ridged handles, or my small paring knife which has a sharp back. The tape doesn’t stretch but it conforms well, making it ideal for protecting your fingertips – just be careful you don’t wind it on too tight!

I wish I’d used it when sanding recently – holding tiny pieces of wood up to the disc sander I slipped and took rather more than the edge off my index fingernails. This is exactly the kind of injury alligator tape is great at preventing due to its abrasion resistance. Luckily I only took a small amount off and it’s grown out now, but the sensation of exposed nail beds isn’t one I’ll forget in a hurry.

I was going to take a picture to show you it in action, but the I just discovered that the roll I bought three months ago has welded itself into a single solid, rubbery mass! Not sure what happened there – I kept it in a plastic bag because the previous one had dried out. So, with the caveat that it might have a really short shelf life or be tricky to store: great stuff!

Alligator tape + cork

I think this particular hack came about because I wanted to hold one end of a piece of silver wire while I melted the other, many, many times over. I didn’t have the right kind of tweezers, so here’s how I dressed my fingers up for the job.

I cut thin slices from a cork, trimmed them to size and wrapped them between layers of alligator tape to make solid, heatproof, reinforced fingertips. The tape holds its shape enough that I can slip them on and off to reuse, and the slightly forgiving cork and rubbery tape gives me a really good grip. This is especially useful for jobs like drilling holes into tiny parts which heat up quickly.

Got any questions, or other useful solutions for protecting your hands? I’d love to hear about ’em!

Categories
Uncategorized

Lateral thinking – Chopsticks and crisps

It’s always a bit disconcerting when someone sees what I’m doing, stops dead, then says wonderingly “it* makes perfect sense, but still…” and wanders off shaking their head.

Just me?

* I was on the market stall, and needed a snack but wanted to keep my hands clean for dealing with customers, so I was eating my Monster Munch with chopsticks. It worked perfectly!

Categories
Blog

Making of… hinged dragonfly pendant

Paul came to me looking for a dragonfly-themed piece, as an extra-special gift for his wife’s significant birthday.  It seemed the perfect excuse to revisit my hinged dragonfly pendant concept from 2008, but in my now favourite medium – wax carving and casting.  As discussing various design options, we chose a theme of stylised realism, with moving, articulated wings and with the dragonfly’s body itself as the clasp pin.

I hybridised these two designs

I began as usual by researching the subject, including looking at close-up images of dragonfly wings.  I simplified the body plan, omitting the deep keel and legs to streamline the design and ensure the piece would sit well against the wearer’s body.  I planned for it to be 80mm (3”) wide – not quite matching the largest I’ve seen in the wild, but certainly substantial enough to be a statement piece without overwhelming the wearer.

I started construction with the head and body, by threading thin slices of wax onto a drill bit and carving, filing and sanding them as a single piece.  I use a ‘wax pen’ – a small battery powered hot wire – to melt and weld wax scraps together.  This allowed me to build up the shape of the head for sculpting.

Testing the body against
paper wings

I glued design printouts onto slabs of wax, cut the wings out roughly then carved them down to the final size.  Continuing to work in 2D I thinned the wings down to about 3mm overall, then welded them onto the wax body. 

At this point I began sculpting the wings to be 3D.  I wanted to echo the independent, twisting movement of a dragonfly’s wings, without compromising the structurally important overlap.  I got the wings down to 1mm thick, with a 2mm ridge at the leading edge for stiffening and to reinforce the overlap. 

I held the wax up to the light frequently as I worked – you can see by the tone how the thickness varies, and if different parts match.  It is also very helpful for spotting stress cracks in time to patch them with a tiny weld. 

Checking wing thickness and spotting a crack at the junction between the right side wings

Once I had the weight and shape of the wings refined, I worked on the body.  I drilled out the core to its final size, and used a brass test pin to ensure the proportions were pleasing. 

I rounded the individual knuckles of the hinge, reducing friction and creating a stylised, segmented look.  I extended the final segment to better mimic a real dragonfly, with the added benefit of extra stability for the hinge. 

Refining and extending the body shape

Now for the fun part – detail!  As the dragonfly was near life-sized, I had the room to replicate the pattern at life-size.  I used techniques I’d honed carving scales onto some of my dragon pieces, which looks especially good when highlighted with a dark patina against a bright polish. I copied the wing’s main structural lines onto the wax with a fine marker, then VERY CAREFULLY scribed the vein lines with a pointed tool. 

Detail, done!

I welded on very fine loops for attaching the chain to the back of the wings, and that was the piece ready to send to the caster.

Testing the action of the hinge with a temporary brass pin

I was delighted with the parts when they came back, requiring minimal clean-up to get the hinge fitting and working.  The fabrication was largely routine, except for shaping the pin.  I wanted to add some textural detail to the tail, help sell the illusion and integrating it with the body portion.  Dragonfly bodies are quite varied, so I selected elements that would work within the constraints, and took a few liberties.  I used my drill as a lathe, supporting the piece with a (well protected) finger or two as I filed and sanded it to shape.  Once complete, I soldered it into a socket in the cast head. 

The finished piece

Oxidising the piece brought out all the details just as I hoped, and it’s ended up a really eye-catching piece.  At the commissioner’s request I added a card with a sketch, to make sure that the recipient knew he’d had it especially made. 

I’m happy to say she was delighted with her new piece!  I’d love to do more dragonfly-textured pieces in future.

Thanks to Paul’s patronage, I’m delighted to offer this piece for general sale and shipping worldwide.

It’s available to pre-order in my shop now, shipping in time for Christmas – for more info and photos of the finished piece, visit the shop page here:

Categories
Blog

The Hinged Dragonfly… 11 years in the making!

If there’s something that really characterises my making, it’s that my reach exceeds my grasp: I’m always striving to realise a new ideas that’re beyond the limits of my experience to date.

This tends to result in what, to the casual observer, might look like a trail of abandoned projects… For me though, it’s a flock of carefully tended treasures. If after throwing all available knowledge, cunning, mad ideas and R&D time at a problem I can’t find a solution, the project gets shelved. In some cases this means literally, as a labelled box of prototypes, or others might be just a few sketches tucked neatly away in my filing cabinet. Years might go by before I come back to a project, but I gather ideas like the box gathers dust, and one day I’ll find just the right one.

The Hinged Dragonfly design is the latest idea that’s come together, and I’m delighted to share it with you.

Back in 2008 I was playing with the theme of butterflies in jewellery. After making some pierced designs (positive and negative shapes cut from silver sheet), I started wondering about articulation.

Articulation… joints… hinges… hinge pins… captive hinge pins… removable hinge pins! The pendant IS the clasp! DRAGONFLIES!

After some prototyping I developed my original hinged dragonfly pendant. The chain is attached to the back of either wing. Each wing has protruding tabs which wrap around to form the knuckles of a hinge. When they are meshed together, a pin slipped through the hinge holds the two wings together. The head of the pin becomes the dragonfly’s head, the length of the ‘body’ pin ensures it can’t slip out by accident.

It was a lovely idea and I am still so, so proud of it. Alas, it was fiddly and frustrating to make, and I wasn’t keen on the abstract look.

By 2013 my saw technique had improved, and I was enjoying jewellery making even more. I designed a more realistic wing profile and created a few more dragonfly pendants, with chains, strings of stones or beads, and with beautiful cabochon gemstones set into the pin heads. I loved the addition of colour, but sawing the wings and hinges from silver sheet and bending them consistently into sheet was still too time-consuming and fiddly. The design went back on the shelf.

After that, I took my jewellery design work in other directions. I wanted to return to my roots and get sculptural, and things really changed when I started to explore wax carving.

I absolutely love wax as medium: its flexibility, its versatility, and the opportunity to replicate a design. It makes it feasible to invest 17 hours in carving a new design, as I can reproduce it and sell it for a sane amount. My Etsy store is full of jewellery designed and produced using wax carving techniques, you’ll probably see how my work has evolved with time.

Suffice to say, with all that practice: I’ve levelled up. I’ve accumulated a lot of knowledge and experience… And then when a visitor to my stall this summer said he liked my dragons but did I have any dragonflies, I knew* it was time to tackle the idea again.

It was such a fun project, and I really enjoyed the challenge of carving it. Best of all, it was a hit with the recipient!

” …just to say the necklace went down very well. Nicky says its one of the most beautiful pieces she’s seen. The movement while wearing really adds to the whole effect.”

– Paul, dragonfly commissioner

I think the 11 year dormancy period paid off.

If you’re interested in buying a hinged dragonfly, please check out the listing in my shop here, which includes an animation of the hinge mechanism in action.

Next up – the making process!

*OK, full disclosure, I was in market mode and completely forgot about the hinged dragonfly concept until my partner reminded me

Categories
Blog

Another 3 things about me

To follow the first 4 things about me, here are another few:

1. Materials and techniques are my special interest

I interrogate every material that’s fallen into my hands. How malleable are you? Brittle? Springy? Can I carve, melt, sand, glue, weld you? How about colour, frost or polish?

When faced with a new problem to solve or solution to build, I love going through my mental index of materials to find just the right thing for the job. Often what’s an excruciating problem in one medium will be trivial in another, but best of all is combining materials to create something really new.

2. I love solving problems by making things

There is a saying when you’ve got a hammer everything looks like a nail… but I have a lot more tools than just hammers! My home is full of small DIY creations that make life easier or a little bit more beautiful. If you want to make me really happy, bring me a small, self-contained problem that I can solve by making something!

It’s also why I love to take commissioned work, be it jewellery, sculpture or fabrication. Every commission is a self-contained project with its own brief, constraints and wonderful conclusion – delivering something I made into a happy customer’s hands.

3. I don’t “see” pictures in my head

I’m never more than a pace or two from a sketchbook (I built one into my wallet) because I need paper to think. Imagination for me is like running my hands over something in the dark – I’m aware of the bits I’m touching for moment, but when I move on they’re gone… so I pin them down with a pen.

It really comes in handy when I’m trying to work things out with someone – being able to sketch what I think they mean lets us figure out where confusions and ambiguities lie, and build a picture together.

I plan to write more about my projects than myself on this blog, but feel free to ask me anything in the comments. Thanks for reading!

Categories
Blog

4 things about me

I’d like to kick-start this blog with an introduction, but didn’t feel like a CV or mission statement, so here are 7 things about me:

1. I’m strongly attracted to bodies of water

As soon as I sight waves I’m off, making a beeline for the breakers. On hot days it’s shoes off and feet in, even if I wasn’t planning on it. The compulsion is less strong in fresh water, but I have paddled in some wonderfully icy glacier lakes.

It’s so typical to find me standing in the waves that my ankle is tattooed with barnacles, and you might see a few (very subtle) signs in my jewellery designs…

2. My hands are always busy

I make things! A lot! Often in situations where it’s not expected, like standing on a crowded commuter train or at a wedding reception. It’s started some lovely conversations, and seeded lasting friendships.

I might work in wax, silver or perspex for the ‘day job’, but I always have myriad other projects on the go. I especially enjoy making things in the midst of a sociable evening of conversation. At home I might pick up anything from sewing to wood carving, but my current travel projects are making iron chainmail, and folding strips of paper into tiny puffy stars!

3. I’m a craft enabler

Would you like to try knitting? Lino-cuts? Inlay? Bookmaking? Spoon carving? Wax casting? Let me know, I will be enthusiastic with you! If I’ve tried it I can usually help you get started, and if I haven’t, I’ll probably be right there with you giving it a go. I can recommend a really good place to try blacksmithing…

4. My first medium was wood

I’ve had the busy-hands thing for as long as I can remember, but the first medium I remember loving was when I started carving wood. I whittled away at driftwood or scraps from the wood store as a teen, sitting in the brightest spot in the house – on the floor next to the glass kitchen door – in a steadily growing mountain of wood shavings.

I have a few small pieces I made in that era, and I’m still proud of the form and finish I achieved. Mostly they’re made from yew harvested from a feral hedge. Yew is very beautiful and takes a lovely polish, but it’s incredibly hard (especially once it’s seasoned), and it has long, stubborn fibres that laugh at blunt knives. I think I gained a lot of hand strength wrestling with it, and learned a lot of patience with splitting and tearing grain, and about working with your material.

It was really good experience, and taught me a lot about wood as a medium, but most of all it made me really, truly appreciate how straightforward wax is to carve!

That’s it for now, hope you enjoyed!